

Answer Installation
Repost license
Request authorization before reposting and retain the authorization code, original URL, and go/affiliate links.
Original URL:https://www.geekcorelab.com/post/answer-installation
The commercial link is an authorized go short link that must stay on the reposted page. It records the source before sending readers to the original article.
本文由原作者(https://forum.rainyun.com/u/LIFL)投稿
Originality Statement
This article is simultaneously published on 风屿岛, 雨云论坛, and 星空'Blog
Please indicate the original address when reposting
Introduction
What is Answer?
Answer helps you build a Q&A community among users or teams. You can share knowledge here and help users solve problems.
Answer Official
How to Deploy Answer?
Answer has three different deployment methods: Docker Compose deployment, Docker deployment, and Binary deployment. In this article, we will only choose one of them for deployment: Docker Compose deployment
Set Sail -- Main Text Begins
Purchasing Products
Cloud Server Purchase
To create a website of your own, you need to purchase a server of your own. Virtual hosting probably won't work, because Answer needs to be deployed using Docker containers, and ordinary virtual hosting probably won't provide such a service.
How to Purchase a Cloud Server?
Cloud servers can be purchased through 雨云. Click the hyperlink above to open the official 雨云 website. If you register through the discount channel above and bind WeChat, you can get a 50% off coupon.
Registration Process
If you have already registered, you can skip this step
After entering the official 雨云 website, click Login/Register
Next, click Register
Next, two situations may occur. If you entered the 雨云 official website by clicking the link above, the following situation will appear:
In this case, you only need to fill in the username, password, and repeat password. However, if you entered from Bing or another search engine, the following situation will appear
In the discount code field, you can fill in chacks, then fill in the username, password, and repeat password, and finally click Register Now.


Backend Management
After entering the backend, look at the row at the top
Click Cloud Products, then click Buy Cloud Server
Select a configuration


Difficulty Choosing —— How to Choose a Cloud Server
If you don't know how to choose a cloud server, you can refer to the official article. Enter the server page
Select the server you purchased, click Manage to enter, and you can view the server information. If you don't understand it, you can refer to the official article

Purchasing a Domain Name
雨云 provides free second-level domains for your reference. Click this link to reach the domain purchase page
Search for the domain name you want to buy in the search box
Then click Search. When purchasing a domain name, a template is required: A domain template refers to the real-name information template that users need to provide when purchasing a domain name. According to the 'Measures for the Administration of Internet Domain Names', users need to provide real-name information before they can register a domain name. You can select an existing template here, or create a new template.
After purchasing a domain name, you can connect it to CloudFlare. For details, see my article


Start Deploying Answer
To simplify the deployment process, the server in this article is managed using 宝塔面板
What is 宝塔面板?
宝塔Linux面板 is server management software that improves O&M efficiency. It supports one-click LAMP/LNMP/cluster/monitoring/website/FTP/database/JAVA and more than 100 server management functions. It is developed and maintained by a professional team of 30 people. After more than 200 version iterations, it has comprehensive functions, is less error-prone, and is sufficiently secure. It has been recognized and installed by millions of users worldwide.
How to Deploy 宝塔面板?
雨云 has a Centos7.9 system with 宝塔 preinstalled. If there is no important information, you can reinstall the system. Centos installation script
yum install -y wget && wget -O install.sh https://download.bt.cn/install/install_6.0.sh && sh install.sh ed8484bec
Ubuntu/Deepin installation script
wget -O install.sh https://download.bt.cn/install/install-ubuntu_6.0.sh && sudo bash install.sh ed8484bec
Debian installation script
wget -O install.sh https://download.bt.cn/install/install-ubuntu_6.0.sh && bash install.sh ed8484bec
Universal installation script
if [ -f /usr/bin/curl ];then curl -sSO https://download.bt.cn/install/install_panel.sh;else wget -O install_panel.sh https://download.bt.cn/install/install_panel.sh;fi;bash install_panel.sh ed8484bec
Domestic Loongson architecture installation script (do not use for other CPUs)
wget -O install_panel.sh https://download.bt.cn/install/0/loongarch64/loongarch64_install_panel.sh && bash install_panel.sh ed8484bec
Tip: Because 宝塔面板 has the highest compatibility with Centos7 systems
After successfully installing 宝塔面板, copy the account and password. After successfully logging in, install the LNMP environment.
Install Docker
If Docker is already installed, you can ignore this step
Open 宝塔面板
Look at the column on the left, and click Docker
Click Install
Wait until installation is complete
Connect to SSH
Because there are many SSH connection tools on the market, detailed connection configuration is not provided
After connecting, you need to choose one of the following two installation methods. The first: do not modify the configuration and use port 8090. The second: modify the configuration and customize the port
The First Method (Recommended)
Enter the command in SSH
curl -fsSL https://raw.githubusercontent.com/apache/incubator-answer/main/docker-compose.yaml | docker compose -p answer -f - up
The Second Method (Not Recommended)
Enter the command in SSH
curl -O -fsSL https://raw.githubusercontent.com/apache/incubator-answer/main/docker-compose.yaml
Download its configuration file
Install Vim
If you do not need Vim or use another editor, you can skip this step
Enter the command
yum -y install vim
Then enter:
vim docker-compose.yaml
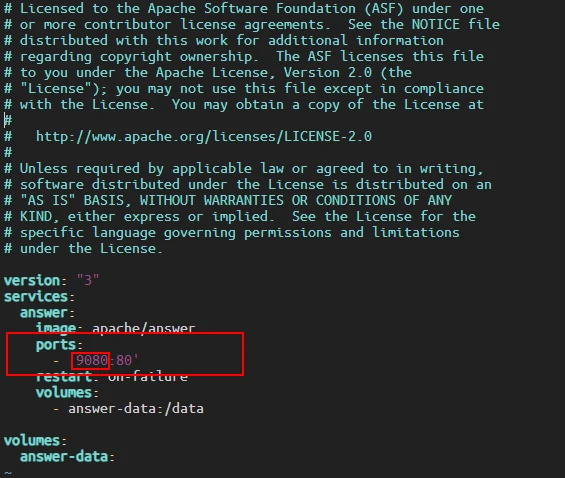
You will see this
The 9080 in it is the host port mapped by Docker. You can change it to another port (using port 80 is not recommended, because this may cause a port conflict)
If you want to modify the code, press i to enter edit mode. After editing, press the Esc key on the keyboard, then enter :wq to save the changes.
Then run manually
docker compose -p answer up
Wait for the image pull to complete......
Configure Answer from 宝塔面板
After the image pull is complete, the container is started by default. You can use Ctrl + C to stop it
Open the Docker management page

As shown in the figure, restart the container
Remember the container's IP


Reverse Proxy
Create a Website
Open the website page
Add a website
Click Submit

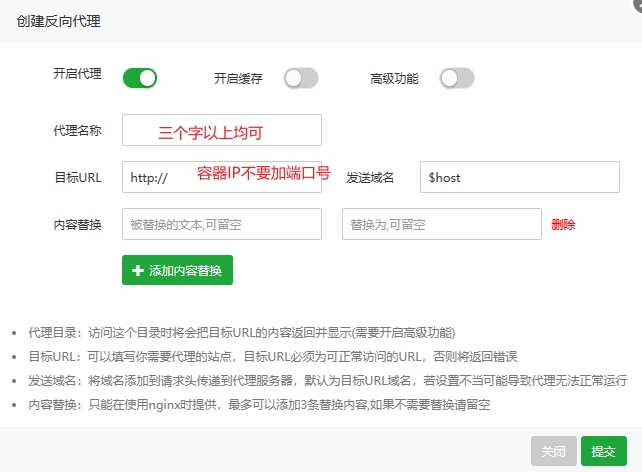
Open the website settings and enter the reverse proxy settings
As shown in the figure, add a reverse proxy

Continue the Answer Installation Process
Language Configuration
Click English(100%) to expand it, then click Simplified Chinese. Click Next

Database Connection Information Configuration
Answer supports the following databases
This article uses SQLite for demonstration

Create the config.yaml file
Click Next

Basic Website Information Configuration
!

It looks very complicated, right? Don't worry, let's translate them one by one:
- Site Information:Website information
- Site URL:The access address of your website; this is filled in correctly by default
- Contact email:The email address of the main contact for the website
- Privte:Private
- Login required:Login required
- Only logged in users can access this community:Only logged-in users can access this community.
- Admin Account:Administrator account
- Name:Account name
- Password:Account password
- Email:Email address
- You will need this email to log in:You need this email address to log in
If you don't understand it, you can use the browser's built-in translation:
For example:
After configuration, click Next

Complete Configuration
Click Done

Answer
Preview —— Display After Deployment
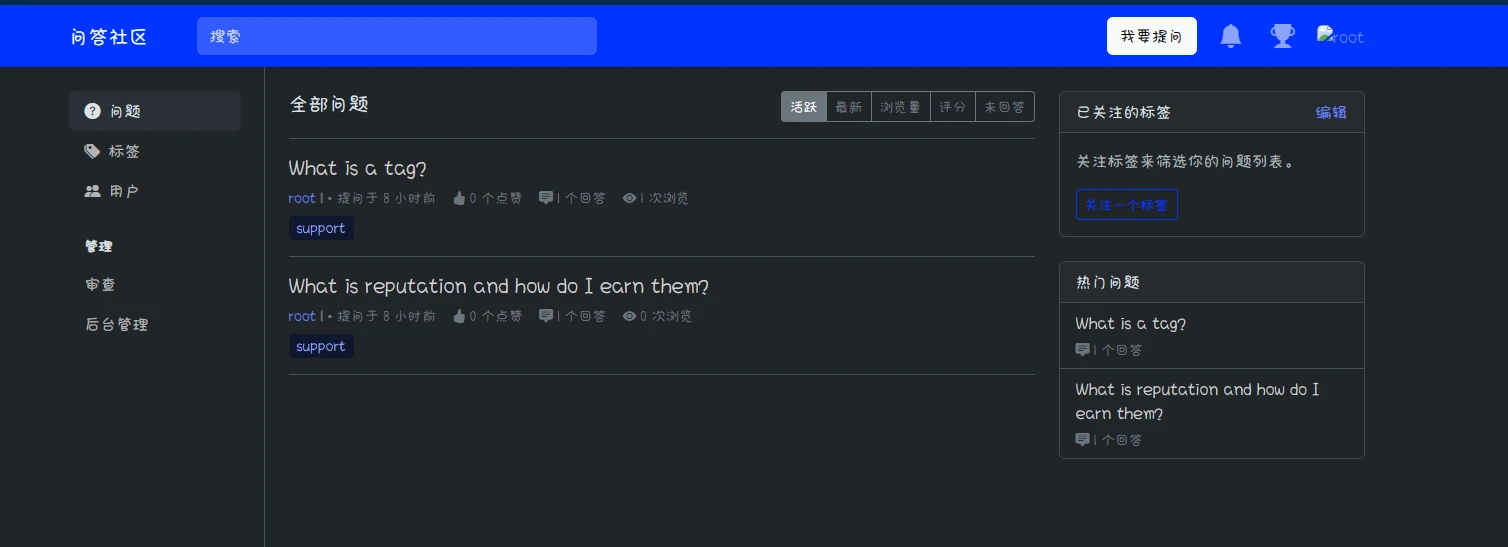
How to Log In to Answer?
You can click Login in the upper right corner to log in
Changed Your Mind —— Need to Modify Basic Website Information
You can visit:
https://<你的站点访问地址>:<端口(选填)>/admin
If your site does not have an SSL certificate:
http://<你的站点访问地址>:<端口(选填)>/admin
Upgrade Answer
The following content comes from the Answer official documentation
We recommend backing up the database and configuration file before upgrading. Normally, we guarantee that upgrades will not affect existing data. Backing up data means that even if the upgrade fails or you do not want to use an advanced version, you still have the option to roll back.
If you install Answer using Docker Compose, upgrading is very simple.
docker-compose pull
docker-compose down
docker-compose up -d
Tip
When upgrade exceptions or other unexpected situations occur, we provide a command to manually force upgrade Answer. answer upgrade -f v1.1.0. Executing this command will force an upgrade starting from the specified version, even if your current Answer is already the latest version. If you encounter upgrade exceptions, you can try executing this command, or re-pull the latest Docker image and then enter the container to execute this command.
FAQ
The following content comes from the Answer official documentation
FAQ
How do I access the installation page?
Please go to http://localhost:9080/install to access the installation page.
Why can't I receive registration emails?
You need to configure your own SMTP in Admin Backend -> Settings -> SMTP.
How do I switch the default language?
The site default language can be switched in . Admin Backend -> Settings -> Interface. Users can switch languages in their own . Settings -> Interface
Which database types are currently supported? Is migration supported?
We support MySQL, PostgreSQL, and SQLite3 databases. Unfortunately, we currently do not support data migration. Therefore, we recommend using SQLite3 only for trying it out, and choosing MySQL for actual use.
Comments
Discussion
Be kind and keep the discussion friendly.
Discussion
0 comments